Projects > wxAstroCapture AVI repair
In February 2010, after carrying out a set of tests on my new Losmandy GM-8 I decided to take advantage of the fact that Mars was well positioned in the sky and capture a few video sequences that I could later process. For several years I have used K3CCDtools and I had planned to do the same this evening too. I started up the program and was prompted for a new registration key. I only have the trial version which requires the download of a temporary registration key every few months. So, undeterred I went to the website to download a new key only to discover that a new key hadn't yet been uploaded to the website. Rather than miss the opportunity to image Mars I decided to find alternate software instead.
It didn't take me long to find the wxAstroCapture website and I promptly downloaded and installed it. As it was after 2am in the morning I wasn't in the mood to start reading through the documentation, besides, it looked fairly straight forward to use. So, without further ado I familiarised myself with the layout of the program and started capturing .avi files almost straight away. The video format options available were RGB24 and YUV420. Without thinking too much about it I selected RGB24.
I spent the next couple of hours capturing several .avi files of Mars and by the time I finished it was about 4:30am in the morning. As I was tired I packed up and went to bed. The next day I decided to take a look at the .avi files before starting to process them. I was surprised to notice that they would not play. Initially I thought this was a codec issue, but that wasn't the case. At that point I searched the wxAstroCapture Yahoo group archives only to discover that others have had exactly the same problem as me, and in all reported cases the data was unrecoverable. I tried to repair the .avi files using tools I found online such as VirtualDub, AVIRepair etc. but sadly none of them worked. While upset, I decided I wouldn't delete the .avi files but instead started to read up on the structure of .avi files to see if the data was actually in the files, or whether it really was lost forever.


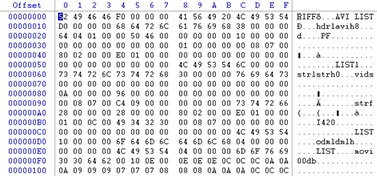
After about a day's worth of effort I discovered that the .avi files had corrupt header information, and that the footer was garbage too. As far as I could tell the actual data was present inside the .avi and technically should be recoverable. Fortunately the RGB24 format does not compress frames. Uncompressed frames are delimited inside .avi files using the hex values for "00db". After each "00db" in the .avi files there is 8 bytes of control data, followed by the raw frame data that continues up to the start of the next "00db".
Using WinHex I copied the data from 8 bytes after the first "00db" tag all the way up to the next "00db". I placed this data into a new file. My plan was to view this frame as a bitmap (.bmp) file. In order for the file to be viewed as a bitmap it's necessary to create a new BMP header for the file. The easiest way to do this is to create (using MSPaint) a new bitmap file with the same resolution as output by my webcam and with the same colour bit depth. In my case this was 640x480 at 24bit (which corresponds to the RGB24 format choice). After creating this image file I used WinHex once again to copy the header to my previously prepared raw data file. I was hoping that I would then be able to view the file as a bitmap image.
Unfortunately this did not work. For some time I couldn't understand this, though I did discover why. For some reason my captured .avi frames actually appear to have a different resolution to the expected 640x480. They are in fact 640x240. I do wonder if this is due to interlacing, though to be honest I'm not entirely sure. After discovering this I then carried out the same process using the header from a 640x240 file. I had a feeling this would still fail as I hadn't modified the footer of the file. As it turns out a bitmap file doesn't require a footer and I was able to view the file! This was excellent progress as it meant that all the data was present in the .avi and recoverable.
The trouble was that it would take about 10 minutes to carry out this process manually for every frame.....and I had about 6000 frames of data! That's over half a year. So, I decided to create a script to carry out the work for me instead. The good news is that after writing this script, and running it against my corrupt .avi files, I was able to recover all but about 6 frames of my .avi files. The script extracts the raw frames as bitmap files, then recreates a new .avi file from the bitmap files.
In case this is of any use to anyone else the process automated by the script is as follows:
- The corrupt .avi file is read into memory as a text stream. It's necessary to read the file using the read(bytes) method or the binary data will not be read correctly using any other VBScript read option. I found that there was a limitation of 256Mb built into VBScript using this method which meant that I had to split my files into 200Mb chunks beforehand (which is also why I lost about 6 frames as these were where I split the files).
- Once loaded into memory the script searches for "00db", adds 8 bytes to the location and then searches for the next occurrence. It then extracts this data using the address ranges discovered using the dd.exe utility (ported from Unix).
- Then the script merges my pre-prepared header to the raw data using the cat.exe utility (also ported from Unix).
- This process is repeated for every frame all the way to the end of the .avi file.
- Finally the script creates a new .avi file from the bitmap files using the command line utility easybmptoavi.exe.
The script I put together is fairly inefficient and not exactly "shrink wrapped" but if anyone does want to use it then feel free to download it from the link below and let me know how you get on. It should work as long as you also saved using the RGB24 format. The only requirement is that you need to know the resolution output by your camera. I believe the actual horizontal resolution will always be half what is expected, so that would need to be remembered when creating the bitmap header. The script will probably require a little bit of tailoring to work for others, but I'm happy to help out if anyone has any questions. It's pretty slow, it took 6 or so hours for it to process my 3Gb of data but it's better than losing hard earned work. Of course, in the future I think I'd rather spend the extra 3 minutes checking my .avi captures actually work rather than spending the 3 days it took me afterwards learning the construction of .avi files and creating a data extraction routine! I just wish that after all that hard work my captures were a bit better!
To use the script you will need to follow this process:
1. If your broken .avi file is larger than 200Mb you'll first need to split it into 200Mb chunks so the VBScript can handle it. Use the filesplit.exe utility provided within the zip file to split your AVI if you need to.
2. If the resolution of your video file was anything other than 640x480 create a new .bmp file using MS Paint. Set the bit depth of the new file to 24-bit and make sure the horizontal resolution is the same as your .avi capture and the horizontal resolution is half your .avi resolution.
3. Open fixavi.vbs with notepad and modify the following parameters:
- Change the "filename" parameter to the fully pathed location to the first 200Mb chunk of your AVI.
- Change the "outpath" parameter to the directory you want the results to end up in.
- Change the "outfile" parameter to be the prefix for the filename of the temporary bmp files the script creates.
- Change "outavifile" to the filename for the fixed avi file.
- Change "ddpath" to be the location where you extract the zip file to.
- Change the path to "hdrfile". The filename should be kept the same.
4. Save the file and then open a command prompt, cd to the directory containing the script and type cscript fixavi.vbs
The script will take about half an hour to run for a 200Mb .avi chunk. Once this has finished you'll need to repeat the process for the next chunk. Just change the parameters in fixavi.vbs accordingly for the second chunk and so on. Good luck!

